I searched in my stash of ministry magazines for a bulletin board idea I could do for church. I came across this one in the March/April 2006 issue of Teach Kids! Magazine (CEF press):
I hope to inspire you to use your creative talents for the Lord and the people He places in your life."Who can find a virtuous woman?...she seeketh wool, and fax, and worketh willingly with her hands." Proverbs 31:10a,13
Thursday, April 28, 2011
Easter week bulletin board
Monday, April 25, 2011
Our Easter Sunday
Our Easter Sunday began early in the morning. We needed to get ready for the "Sonrise" service, but first, I had something fun planned for A. I woke her up and showed her the Easter Garden we had put together the previous week.
Now she has her very own Bible (and it had to be pink--her favorite color!) I signed the inside of it with our names and put the date in there as well. She loved taking it with her to church and showing everyone there.
We had our early service at an area park. We sang songs and read Scripture together, all focusing on Christ's death and resurrection.
After that early service, we went back to church to enjoy a breakfast together. A and I cooked and dyed these eggs the day before. She even made a "Happy Easter" sign and it looked great. However, I need to work on making hard-boiled eggs better, as quite a few of them were a bit too soft. Oh well...at least they looked pretty.:)
The breakfast was followed by Sunday School and another service. It was a great time of celebrating together the real meaning of Easter.
Since we had a couple of services in the morning, the evening service was cancelled. So, we just made the rest of the day a family time for us. We went to Red Lobster for lunch, then went on a hike.
It was a beautiful day enjoying God's creation. When we arrived back home, we had a nice dinner and played a game of Uno together.
How was your Easter? Hope you enjoyed a time of remembering what Christ did so long ago. Let's be thankful now and always...
Saturday, April 23, 2011
Easter Egg Garland
This super-cute Easter egg garland has been all over the web lately, and I had to show it to you just in case you haven't seen it yet. It took us a while to get it done because we were busy with other things, but we are glad to say that the garland went up a couple of days ago and we can enjoy it for Easter and for the rest of spring. I love the look of it in my kitchen as it brightens up my day....
As for other Easter preparations....A and I just finished putting together something for the kids at church and for our neighbors.
Can you guess what it is? It is something I did last year and wrote about. If you can't figure it out, go here to read all about it. It is a simple and meaningful Easter gift.
Labels:
church ministry ideas,
crafts,
holidays,
kids activities
Tuesday, April 19, 2011
Getting all the seeds in...
Q has been working long hours since the weekend to get all of the seeds planted. Here are a few of the things he's been working on, with A's help, of course!
Monday, April 18, 2011
Easter Garden
Here's a fun and meaningful activity you can do this week for Easter. It's called the Easter Garden. It's a great way to teach the children in your life the real meaning of Easter.
To make your Easter garden, you'll need the following materials:
1. a large tin foil dish or baking tray
2. damp sand or peat
3. empty toilet paper roll
4. a large round stone
5. twigs, flowers, leaves, small stones,etc.
How to put it all together:
Fill your tray with sand or peat. Lay the toilet paper roll on the surface, and cover with more sand or peat to make a hill. Leave one end uncovered.
Place the round stone to one side of the hole to represent the stone rolled away from the empty tomb.
Use the twigs, flowers and stones to complete the Easter Garden.
You can add lots of different things to embellish your special garden. The possibilities are endless!
When we showed Q our project, he and A talked about the twig being the cross, so he broke off a couple of the branches to make it look more like that. Take a look at it now....
We are keeping the tomb closed until Easter Sunday. I'm thinking about surprising A on Sunday morning with a small sign next to the open tomb that says, "He is Risen!" This simple project has already help begin conversations about Christ dying on the cross and His resurrection. Use it in your home, Sunday School classroom or where ever you'll have children this week. It is a wonderful ministry tool that I hope will teach many about why we celebrate Easter.
I found the idea for the Easter garden in this Spring Activity Book that I found at my local thrift store for a quarter.:) We have already done a couple of simple projects out of it and hope to do more.
Have a wonderful Easter celebrating the Christ who died for our sins and rose from the dead!:)
Sunday, April 17, 2011
Bath time fun
Recently, I was flipping through my Family Fun Craft book, and I noticed a couple of projects we could do to make bath time more fun for A. The first thing we made was a whale scoop using an empty milk jug, scissors and permanent marker.
She loves using the scoop to play with the water and to rinse herself off at the end of her bath. Mr. Whale also stores other bath toys when not in use, keeping the bath tub a lot cleaner these days.:)
We've also had some fun with this batch of homemade finger paints. The recipe calls for a bit of dish soap, so they're perfect for bath time.
A makes shapes and letters on the wall--a great educational activity. And the nicest thing about it is that it washes right off when she's done playing with it.
Here's the recipe for you to try:
Homemade finger paints
2 tablespoons sugar
1/3 cup cornstarch
2 cups cold water
1/4 cup clear dishwashing liquid
food coloring (for vibrant colors, use food coloring paste)
Mix the sugar and cornstarch in a small pan, then slowly add the water. Cook over low heat, stirring until the mixture becomes a smooth, almost clear gel (about 5 minutes). When the mixture is cool, stir in the dishwashing liquid. Scoop equal amounts into containers and stir in the food coloring. Store in airtight containers.
Labels:
crafts,
educational activities,
kids activities,
recipes
Tuesday, April 12, 2011
The chicks meet the outside world...
Our four chicks have been enjoying time outside since last week. Q takes them out on warm days to get used to being out in the garden. They're learning how to dig for food. Once in a while, they find a bug and eat him up!
Dorothy (the black chick show here) sometimes finds a way to get out of this small coop that Q put together. She doesn't go very far and eventually runs back inside. The four have become a family and they stick together out there.
Look how big the turken is here! As we have not really settled on a name for her, we've been calling her Turkey Lurky and it seems to fit.
Q will continue taking the chicks out for a few hours during the day time, but at night, they're back inside. He's ordered a real chicken coop that should be here soon. Dorothy, Tinkerbell, Mary Poppins and Turkey Lurky will have fun in there, for sure.;)
Monday, April 11, 2011
Chore pockets
After brainstorming with Q about a chore chart for A, we came up with an easy way for her to remember what to do each day. I decorated large envelopes with photo corners and labeled them as follows: morning chores, evening chores and done. I stuck them onto the wall using sticky-tack. These chore pockets are fun and easy to put together for the young children in your home.
The morning chore pictures remind A to....
...get up and use the bathroom, eat breakfast, get dressed, brush her hair, brush her teeth and make her bed.
The evening chore pictures remind her to...
...wipe the table and sweep the floor after dinner, clean up her toys/craft projects, put on her pajamas, brush her teeth, and read books, sing and pray with us before lights out.:)
She is doing a great job so far with this new system. Right now we have a couple of incentives for her if she does her chores happily and right away. I have put up an index card next to the pockets that says if she does her chores for seven days, she can have a pair of sunglasses. It's the thing she's been wanting for a while, so we think this is a good way she can earn them. She also loves to vaccuum, even though it is not on her regular chore list. Q told her that she can earn fifty cents each time she vaccuums the back part of our house, up to twice a week (which is three rooms and a short hallway).
We want A to learn how to work hard and obey because God wants us to; it is an important principle to learn. So, we may not always give her a physical reward of some kind, and that's okay. We give her tons of praise in the process and she loves to please with the jobs she's given.
Sunday, April 10, 2011
Well worth the wait....
For the past several weeks, Q and I, along with a few others from church have met each Wednesday afternoon to pass out church invitations in different neighborhoods. We go out in pairs and place one of these beautifully printed tracts at each door.
It is so easy to give up and be discouraged when you're out week by week inviting others to your church and witnessing for the Lord. I'm reminded of Galatians 6:9 that says, "And be not weary in well doing, for in due season we shall reap if we faint not."
Keep on keeping on in your efforts for the Lord. In due season, we will reap what we sow!:)
Friday, April 8, 2011
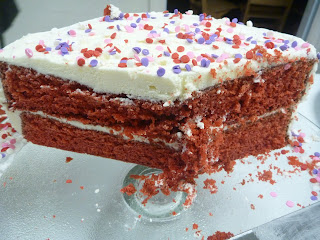
Red Velvet Cake
A surprise birthday party was in the works for a while, and it finally happened. We really surprised our friend, Pat after church Wednesday night. Another lady, Shirley, put all of the refreshments together and Q asked A and I to make the dessert. She and I worked together on a red velvet cake. For a four-year-old, I thought she did well from start to finish. I think her favorite part was putting the frosting and sprinkles on with my help.
Here's a look at our finished creation....
And best of all, the birthday girl enjoyed her slice, along with the sweet fellowship of friends all around her.
And just in case you want to make this fun birthday cake, here's the recipe. It comes from Better Homes and Gardens Annual Cookbook from 2008.
Red Velvet Cake
3 eggs
3/4 cup butter
3 cups all-purpose flour
2 teaspoons unsweetened cocoa powder
2-1/4 cups sugar
1-1/2 teaspoons vanilla
1 1 ounce bottle red food coloring (2 tablespoons)
1-1/2 cups buttermilk
1-1/2 teaspoons baking soda
1-1/2 teaspoons vinegar
1 recipe Buttercream Frosting (recipe below)
1. Let eggs and butter stand 30 minutes. Preheat oven to 350 degrees. Grease and flour three 8x1-1/2 inch round baking pans; set aside. (I used two 9-inch pans and it worked well.)
2. In bowl combine flour, cocoa powder, and 3/4 teaspoon salt; set aside. In mixing bowl beat butter on medium-high 30 seconds. Add sugar and vanilla; beat until combined. Add eggs 1 at a time; beat on medium-high 30 seconds. Add sugar and vanilla; beat until combined. Add eggs 1 at a time; beat on medium after each addition. Beat in food coloring on low.
3. alternately add flour mixture and buttermilk to egg mixture; beat on medium-low after each just until combined. Stir together baking soda and vinegar. Add to batter; beat just until combined.
4. Spread in prepared pans. Bake 25 to 30 minutes or until pick inserted near centers comes out clean (cakes may appear marbled). Cool in pans on wire racks 10 minutes. Removed from pans; cool.
5. Prepare Buttercream frosting. Place one layer, flat side up, on plate. Spread top with 3/4 cup frosting. Stack layer, flat side up; spread top with 3/4 cup frosting. Stack final layer, flat side down; spread remaining frosting on top and sides. Makes 16 servings.
Buttercream Frosting
In saucepan whisk together 1-1/2 cups whole milk, 1/3 cup flour, and dash salt. Cook and stir over medium heat until thickened and bubbly. Reduce heat; cook and stir 2 minutes more. Transfer to bowl; cover surface with plastic wrap. Refrigerate until cooled (do not stir). In bowl beat 1-1/2 cups softened butter, 1-1/2 cups sugar, and 2 teaspoons vanilla on medium 5 minutes until light and fluffy and sugar is almost dissolved. Add milk mixture, 1/4 cup at a time; beat on low after each until smooth.
Tuesday, April 5, 2011
Oreo Stuffed Chocolate Chip Cookies
When I saw the recipe for these cookies here, I couldn't wait to make them. We had a spring snow on Sunday afternoon which gave me a good excuse to make these with A. We had a great time making these and eating them, too! We shared them with folks at church, neighbors and her teachers at school. You'll love them, too, but note that these cookies are HUGE! You'll probably want to share one with a friend. Enjoy!:)
Oreo Stuffed Chocolate Chip Cookies
2 sticks softened butter
3/4 cup packed light brown sugar
1 cup granulated sugar
2 large eggs
1 tablespoon pure vanilla
3-1/2 cups all purpose flour
1 teaspoon salt
1 teaspoon baking soda
10 ounce bag chocolate chips
1 bag Oreo cookies, double stuff (I used the store brand and they still worked great!)
1. Preheat oven to 350 degrees. In a stand or electric mixer cream butter and sugars until well combined. Add in eggs and vanilla until well combined.
2. In a separate bowl, mix the flour, salt and baking soda. Slowly add to wet ingredients along with chocolate chips until just combined. Using a cookie scoop, take one scoop of cookie dough and place on top of an oreo cookie. Take another scoop of dough and place on bottom of oreo cookie. Seal edges together by pressing and cupping in hand until oreo cookie is enclosed with dough. Place onto a parchment or silpat lined baking sheet and bake cookies 9-13 minutes or until cookies are baked to your liking. Let cool for 5 minutes before transferring to cooling rack. Serve with a tall glass of milk.
Makes about 2 dozen VERY LARGE cookies
This is how the cookies looked after baking....
And this is how one of them looked like after Q bit into it....
Friday, April 1, 2011
A's activity jar
It's been a busy week, as Q and I have been doing respite care for twin brothers since last Friday. They go home tomorrow, and hopefully, I'll be back to blogging more regularly. I've been wanting to share with you something I've been doing with our foster daughter A, which has been a lot of fun and a help, too.
It's called the Activity Jar. Inside this canning jar are strips of paper that each have some kind of activity written on it. I put a label on it with smiley face stickers on the side (I've erased A's name for privacy).
There's usually time to do a couple in the morning before lunch. Sometimes we even do a couple in the afternoon after rest time. The first rule I have is that she at least do an activity for about twenty minutes, even if it is not her favorite. Of course, we have found a few things she really loves, so she spends a lot of time on those. The second rule is that whatever she chooses, that's what we do (unless it requires me to play a game with her and I can't just then because I'm busy prepping a meal or something; then she just chooses something else).
When she gets done with an activity, it goes into another jar. When the activity jar is empty, we put them all back and start over. I've already thought of a couple things to add for the next round to keep it exciting!
Here are a few of the activities I've come up with. I've put a * next to the ones that A really loves.:)
1. Practice writing letters in tablet. *
2. Play dress-up.
3. Put on a puppet show.
4. Make a macaroni necklace. *
5. Type on the computer. *
6. Play with paper/magnetic dolls. *
7. Play with play-dough and cookie cutters. *
8. Play Candy land, Hi-ho cherrio, or Memory. *
9. Paint with watercolor pencils.
10. Do giant puzzles. *
As the weather is getting warmer, I've been thinking about coming up with a jar for outside activities like sidewalk chalk, painting with water, playing soccer, flying a kite, nature walks, bubbles, etc.
Have any of you done something like this? If so, what activities can you suggest for us to add to the jar? I'd love to hear your ideas.:)
Subscribe to:
Posts (Atom)