Showing posts with label recipes. Show all posts

Wednesday, January 9, 2013

Peppermint Brownies

For the last M.O.P.S. meeting of 2012, the gals put together brownie mixes. I had first planned on having them put together cookie mixes, but when I saw this idea, I knew I just had to do it. Sure, it was a splurge on the peppermint chips, but it was well worth it! They are soooo yummy (you can enjoy these any time of the year for sure!)

Instead of using canning jars, we used holiday treat bags that you can buy at Hobby Lobby, Target or Walmart. It was a great idea from one of the gals on the steering committee and I am thankful for it. It saved us a lot of money!

I found the tutorial for these here. It also includes the link to print out the labels. The front one that is shown above is super cute, isn't it? The second label is placed on the back and it includes the directions and further ingredients to put these yummy treats together.


These mixes make great gifts for a neighbor, teacher or friend. Enjoy!

Thursday, January 26, 2012

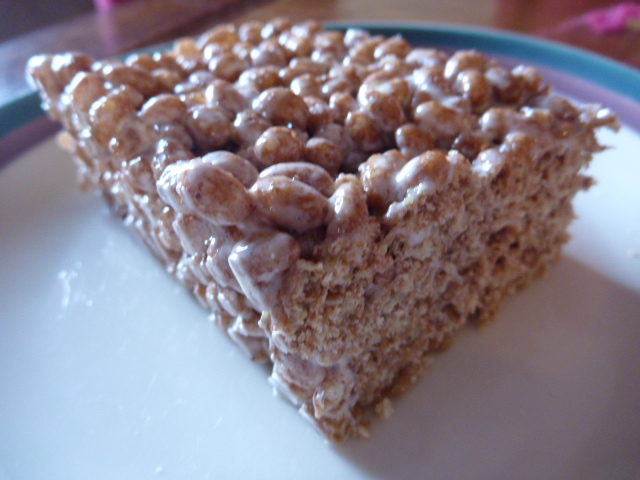
Marshmallow Crispy Treats

We have a favorite dessert in our house--these marshmallow crispy treats!

They are not ordinary either, as they have a secret ingredient in them--flaxseed. Flaxseed can be added to all sorts of recipes, but I never thought about this one. I found the recipe in Jessica Seinfeld's cookbook, Deceptively Delicious. All of the recipes have secret ingredients in them, mainly pureed vegetables. Everything we have tried has been awesome! Pureeing food hasn't been that difficult, but if you have some extra jars of baby food, they can be used as well (Little S grew out of them really fast, so I still have some jars I'm trying to use up when I can.).

So, enjoy this sweet treat this weekend with a tall glass of milk (you'll probably want to get a second one when you're done, but that's okay--they're "healthified"!).

Marshmallow Crispy Treats

Nonstick cooking spray
1 tablespoon trans-fat-free soft tub margarine spread
1 (10-ounce) package marshmallows
6 cups crisp brown rice cereal
1/4 cup flaxseed meal

Coat an 8x8-inch baking pan with cooking spray. Melt the margarine in a large pot over low heat. Add the marshmallows and stir until completely melted. Remove the pan from the heat. Add the rice cereal and flaxseed, and stir until the rice is well coated with marshmallow. Press the mixture into the baking dish and let cool before cutting into squares.

Makes 8 large squares.

Thursday, January 5, 2012

A favorite holiday pie

As I've been planning on what to write here over the next few weeks, I couldn't pass up sharing a few holiday favorites, including this pie:

It is no ordinary pie, either as it has three layers of sweetness! On the bottom is a chocolate layer, followed by a cheesecake layer in the center, then to top it all off, a pumpkin pie layer!

I found the recipe for Pumpkin-Chocolate Cheesecake Pie in Better Homes and Garden's Annual Recipe Book from 2008. You'll definitely want to try it for a holiday, birthday or other special event. Enjoy!

Pumpkin-Chocolate Cheesecake Pie

1 recipe Deep-Dish Pie Pastry (see at bottom of recipe)
12 oz. cream cheese, softened (1-1/2 8 oz. pkgs.)
1/4 cup granulated sugar
1 egg, lightly beaten
3/4 cup miniature semisweet chocolate pieces
1 15-oz can pumpkin
2/3 cup packed brown sugar
2 teaspoons pumpkin pie spice
4 eggs, lightly beaten
3/4 cup half-and-half or light cream
chopped chocolate (optional)

1. Preheat oven to 450 degrees. Prepare and roll out Deep Dish Pie Pastry. Transfer pastry to a 9-1/2 to 10-inch deep-dish pie plate. Trim crust edge 1/2 inch beyond pie plate. Flute edge high. Line pastry with double thickness of foil. Bake 8 minutes. Remove foil; bake 6 minutes more or until golden. Cool on wire rack. Reduce oven temperature to 375 degrees.
2. In medium mixing bowl combine cream cheese, 1/4 cup granulated sugar, and 1 egg; beat on low speed until smooth. Spread cream cheese mixture in cooled pastry shell. Sprinkle with chocolate pieces.
3. In bowl combine pumpkin, brown sugar, and pie spiece. Stir in 4 eggs. Gradually stir in half-and-half. Slowly pour pumpkin mixture on chocolate layer. To preven overbrowning, cover pie edge with foil.
4. Bake 60-65 minutes or until knife inserted near center comes out clean. Remove foil. Cool on wire rack. Cover and refrigerate within 2 hours. Top with chopped chocolate. Makes 8 servings.

Deep-Dish Pie Pastry--In medium bowl stir together 1-1/2 cups all-purpose flour and 1/4 teaspoon salt. Using pastry blender or two knives, cut in 6 tablespoons shortening until pieces are pea size. Sprinkle 1 tablespoon cold water over part of flour mixture; gently toss with fork. Push moistened dough to side of bowl. Repeat, using 1 tablespoon water at a time, until all flour is moistened (5 to 6 tablespoons total). Form into ball. On lightly floured surface, flatten dough. Roll pastry from center to edge to 13-inch circle.

Top with whipped cream if you'd like--yum!:)

Wednesday, November 30, 2011

Turkey cookie treat

At my last MOPS meeting, someone in my group brought a sweet treat for us to enjoy:

So cute, huh? The turkey's body is a chocolate-covered cherry--yum! It was a nice surprise. Everything was "glued" together with chocolate frosting. The girls loved eating theirs up as I was able to bring a few of them home with me.

Just another cute idea to remember for next year.....

Edible Indian Corn

Here's a yummy treat that I made for A's class right before Thanksgiving break. I found this idea on Family Fun and I could not wait to try it out! This edible Indian corn looks hard to put together, but it really is not. I did the majority of the work and then A helped me put on the green fruit leather at the end.

These treats were a huge hit with her teacher and classmates.

So, here's the recipe for ya if you want to give them a try. I'm sure you can make some interesting shapes, perhaps stars for the Christmas season. :)

Edible Indian Corn
Makes 15 treats

4 tablespoons butter
4 cups mini marshmallows
5 cups puffed corn cereal (KIX)
1-1/3 cups diced dried fruit
popsicle sticks
fruit leather

In a large pot, melt butter and mini marshmallows over low heat (about 5 minutes). Remove the mixture from the stove and use a wooden spoon to stir in puffed corn cereal and diced dried fruit. Allow the mixture to cool for about 10 minutes. Using buttered hands, shape each treat by pressing 1/3 cup of the mixture around a popsicle stick. Add fruit leather husks to the bottom of the ear, slightly moistening them to help them stick if needed.

Thursday, October 27, 2011

Snow fluff cookies

As mentioned in my previous post, we got our first big snow of the year. It was really cute to hear A talk about how it was Jesus' birthday and suggest making gingerbread cookies. She immediately associated the winter scene outside with Christmas. I had to explain to her that the holidays weren't for a while yet. She was disappointed as she cannot wait for Christmas.

This snow picture right outside our door was so beautiful and peaceful. Hard to think that it was so much warmer just a couple of days before this happened!

Remember the mobile I told you about? It has a completely different look with the snow in the back ground.

We began a tradition in our house a few years ago that involves the first day of snow. We make cookies and drink hot chocolate. Now with kids, this day is even more fun. I have enjoyed making snowball cookies, but this year I chose to do something different. By looking in a couple of cookbooks, I came across a recipe for snowfluff cookies. Another recipe called them cornflake kisses. No matter what you call them, they are perfect for this special day.

A and I used the recipe in this Mix and Fix Cookbook (published by Parents Magazine years ago). This book has been mine since I was a young girl. Flipping through the pages has brought back memories of making some of these recipes.

Here's the recipe where it's called cornflake kisses:

2 egg whites
2 cups cornflakes
3/4 cup sugar
1/2 teaspoon vanilla flavoring
1 cup dry shredded coconut

1. Beat the egg whites until they are stiff.
2. Gradually add the sugar, and keep beating!
3. Gently fold in the other ingredients, just barely mixing everything together.
4. Drop the batter onto a greased cookie sheet, a teaspoonful at a time.
5. Bake in a moderate oven (325 degrees) for 12 minutes.

Makes 30 small kisses.

After lunch, Q and A went sledding for a while. When they returned they were drenched, but had such a good time together. We all sat down to eat snowfluff cookies and drink hot chocolate. This is such a neat tradition for us to continue with the kids.:)

Tuesday, August 16, 2011

A lifesaver in the kitchen

I know it's been a while, but things have been super busy around here. With fighting a cold and getting A ready for school, life right now is having me focus on more important things.

But--I wanted to share with you something that has been motivating me to do better at meal planning and cooking during this busy time of taking care of two little girls. My sister-in-law told me about E-mealz, a website devoted to helping others with this endeavor. For a small monthly fee you get a 7-day menu plan (just dinners) and shopping list at the grocery store of your choice (there are a couple to choose from or you can choose an option to use another store). They keep your shopping cost low by searching for deals and listing store-brand items on the shopping list. They do it all (minus the shopping, of course!).

Isn't that amazing? Even though I have always enjoyed putting together a meal, things get crazy around here and sometimes it forces me to do something easy--which is not always the healthiest food to eat, either. But with this system, I am cooking meals again and everyone loves them. I chose the 4-6 person low-fat plan, using Wal-mart as my store. I always have leftovers for the next day, so that helps, too. I don't usually choose all seven meals, but rather my favorite 3-4, which lasts all week.

So, what do you think? Check out the site today if you'd like to learn more about it (click on the link above).

Below is a picture of one of our favorite meals so far--Apple Baked French Toast....yum!


Thursday, July 28, 2011

Strawberry Lemon Trifle

A and I made this easy (and low fat!) dessert for a ladies Bible study last weekend. It comes from Taste of Home's Fast Fixes with Mixes Cookbook. We enjoyed every bit of it, as it was a refreshing treat during this summer heat.

Strawberry Lemon Trifle

4 ounces fat-free cream cheese, softened
1 cup fat-free lemon yogurt
2 cups fat-free milk
1 package (3.4 ounces) instant lemon pudding mix (for a creamier treat, use two boxes and double the milk)
2 teaspoons grated lemon peel
2-1/2 cups sliced fresh strawberries, divided
1 tablespoon white grape juice or water
1 prepared angel food cake (10 inches)

In a mixing bowl, beat cream cheese and yogurt. Add the milk, pudding mix and lemon peel; beat until smooth. In a blender, process 1/2 cup strawberries and grape juice until smooth. Tear cake into 1-inch cubes; place a third in a trifle bowl or 3-qt. serving bowl. Top with a third of the pudding mixture and half of the remaining strawberries. Drizzle with half of the strawberry sauce. Repeat. Top with remaining cake and pudding mixture. Cover and refrigerate for at least 2 hours. Yield: 14 servings.


Monday, June 27, 2011

Home made strawberry ice cream

We've been harvesting quite a few strawberries lately and have had some to share, too. For a while, A has been wanting to make strawberry ice cream. This past Sunday afternoon was the perfect time to do this fun project together.

It was fun picking berries with her. We made sure that the ones we chose were bright and perfect (no bugs or holes in them!)

We filled part of a large bowl of varying sizes of these beauties...

We made the vanilla custard on the stove top, which we let cool for a bit before putting it in the refrigerator.

We washed the strawberries and took the stems off. We put them in the refrigerator to get cold. Then, we took turns smashing them with a fork.

Once the custard was cool, we began the churning process. We poured the smashed berries in and let my Kitchen Aid do the work. I have an ice cream mixer bowl that has special attachments and churns the ice cream beautifully.

When the churning was done, I put the ice cream in a container and put it in the freezer. After church, it had been about four hours, and it was still a little soft--but scrumptious nonetheless!

There's nothing like fresh homemade strawberry ice cream on a hot summer day....

So you want the recipe? This one came from a book called, Soda Fountain Classics, by Elsa Petersen-Schepelern.

You'll love this ice cream as much as we have this week!

Rich Strawberry Ice Cream

3 eggs, plus 2-3 yolks
4 cups milk or light cream (I like to do half of the amount with milk and the other half with cream)
1-1/4 cups sugar

Put the eggs and yolks in a bowl and beat until smooth. Heat the milk (or cream) and sugar in a saucepan to just below boiling. Gradually stir 1/2 cup of the hot liquid into the beaten eggs, then stir the mixture back into the saucepan. Stir over a gentle heat until the mixture thickens (stir in the same direction). do not let it boil or the custard will curdle. (Some people use a double boiler or a bowl set over a saucepan of simmering water). When the mixture is thick enough to coat the back of a spoon, remove from the heat, strain into a bowl or pitcher, cool, and chill. Before churning, add 1 cup mashed fresh strawberries. Churn (in batches if necessary) and freeze.

Makes about 6 cups.

Sunday, June 12, 2011

A's Fairy Birthday Party: the cake

The last thing I made for A's party was her cake. I wanted to do it to her specifications and make it really special....but, with a baby added to our family recently, I didn't know how I was going to do it. The Lord helped me get it all done (hooray for naptime) and it was a great teaching time as both girls watched me for a bit while I worked. A even helped make the frosting. :)

So, here's the cake before adding the candles. I did write A's name on the bottom of the cake, but removed it for privacy.

The frosting was home made. I used Wilton's recipe (see below). I colored the main cake and grass by adding green food coloring to the frosting. But, when I realized I didn't have anything for the flowers, I panicked (just slightly). Then I began to think about what I could add that would add color. I walked to the corner grocery store with the girls and bought strawberry flavored jello. It worked! Q noticed that the flowers had a slightly different taste, but it tasted great. After making the pink frosting, I made another color by adding blue to it. It came out more of a periwinkle blue than a purple, but I was still pleased with it.

The writing was done using a purple gel writer which can be found at just about any grocery store. As for decorating tips goes, I used the grass tip and the star tip for the rest of the cake.

Here's the cake with the candles on it. I found this set of Tinkerbell candles at Walmart for a few dollars. It really completed the look.

When A saw her cake she said, "This is the best cake ever!" It really made my day that she enjoyed it so much.

Here are the recipes that I used to put it all together:

Best-Ever Chocolate Cake
(from Our Best Recipes by Better Homes and Gardens)

3/4 cup butter
3 eggs
2 cups all-purpose flour
3/4 cup unsweetened cocoa powder
1 teaspoon baking soda
3/4 teaspoon baking powder
2 cups sugar
2 teaspoons vanilla
1-1/2 cups milk

1. Allow butter and eggs to stand at room temperature for 30 minutes. Lightly grease bottoms of three 8-inch round cake pans or two 9-inch cake pas or two 8x8x2-inch baking pans. Line bottoms of pans with waxed paper. Grease and lightly flour waxed paper and sides of pans. Set pans aside.

2. Preheat oven to 350 degrees. In a medium bowl, stir together the flour, cocoa powder, baking soda, baking powder, and 1/2 teaspoon salt; set aside.

3. In a large mixing bowl, beat butter with an electric mixer on medium to high speed for 30 seconds. Gradually add sugar, about 1/4 cup at a time, beating on medium speed for 3 to 4 minutes or until well mixed. Scrape side of bowl; continue beating on medium speed for 2 minutes. Add eggs, one at a time, beating after each addition (about 1 minute total). Beat in vanilla.

4. Alternately add flour mixture and milk to beaten mixture, beating on low speed just until combined after each addition. Beat on medium to high speed for 20 seconds more. Spread evenly into the prepared pans.

5. Bake for 30 to 35 minutest for round cake pans 35 to 40 minutes for 8-inch square pans, or until a wooden toothpick inserted in the centers comes out clean. Cool cake layers in pans for 10 minutes. remove from pans. Peel off waxed paper. Cool completely on wire racks.

Buttercream recipe

1/2 cup solid vegetable shortening
1/2 cup butter or margarine, softened but not melted
1 lb. confectioners sugar (about 4 cups)
2 tablespoons milk or water
1 teaspoon vanilla

Cream shortening and butter. Add sugar, water and vanilla. Blend on medium speed until all ingredients are mixed well. Blend a minute or two more until creamy in texture. If using a hand mixer and icing is not creamy, use high speed or add more milk a drop at a time. This icing can be refrigerated in an air tight container for up to 2 weeks. Rewhip before using. Yield: 3 cups stiff icing. To thin icing add 2 teaspoons milk per cup of stiff icing.

Tuesday, May 17, 2011

Can't-Leave-Alone Bars

Are ya looking for a new recipe to try using a cake mix? If so, I've got the recipe for you. As A and I were searching for a yummy dessert to serve to some friends, we came across this one in Taste of Home's Fast Fixes with Mixes Cookbook. These brownies are called Can't-Leave-Alone Bars for a good reason--you really can't leave them alone after you've tried one. They are addicting!

Can't-Leave-Alone Bars

1 package (18-1/4 ounces) white cake mix
2 eggs
1/3 cup vegetable oil
1 can (14 ounces) sweetened condensed milk
1 cup (6 ounces) semisweet chocolate chips
1/4 cup butter, cubed

In a bowl, combine the cake mix, eggs and oil. With floured hands, press two-thirds of the mixture into a greased 13-in. x 9-in. x2-in. baking pan. Set remaining cake mixture aside. in a microwave-safe bowl, combine the milk, chocolate chips and butter. Microwave, uncovered, on high for 45 seconds; stir. microwave 45-60 seconds longer or until chips and butter are melted; stir until smooth. Pour over crust. Drop teaspoonfuls of remaining cake mixture over top. Bake at 350 degrees for 20-25 minutes or until lightly browned. Cool before cutting. Yield: 3 dozen.

Friday, May 13, 2011

Mother's Day cupcakes

When I saw these gorgeous flower cupcakes at Raising Homemakers, I knew this would be the perfect thing to do for all of the moms at church (click here for a complete tutorial). They are called "mum-cakes" as they resemble mums.

A and I worked in two different segments (taking a break in between to spend time at the library) to make these beauties. We spent three hours on twenty-one cupcakes, and that doesn't include the baking time. I used a cake mix (which I rarely do) to speed up the time. I also made a quick and simple batch of buttercream frosting, but this can also be purchased to help save time. The end result was astonishing! I was so glad that A really stuck with it and had lots of fun helping me put these together.

Take a look....

The petals are made out of mini marshmallows that are cut in half and dipped in colored sugar. This is the most time-consuming part of it, so grab a friend or your kiddos and have fun doing this.:) The frosting acts like the glue as you put the petals on working from the outside in. And just a note about that....you might want to frost a handful at a time as the frosting hardens as it sits out.

Most of the cupcakes were a solid color, but as we were getting close to the end, we made a few that had a few colors in them. They still looked so pretty!

All of the moms enjoyed their special cupcake after church. I even got to enjoy one later as A let me know that I could get one too because I was a mom (so cute!).

These cupcakes could be used for any spring or summer celebration. Just make sure you plan ahead and know that these will take a while. The end result is worth it!:)

Sunday, April 17, 2011

Bath time fun

Recently, I was flipping through my Family Fun Craft book, and I noticed a couple of projects we could do to make bath time more fun for A. The first thing we made was a whale scoop using an empty milk jug, scissors and permanent marker.

After we cleaned it out, I cut some of the top off to make a large mouth for our whale. Then, A gave the whale a face using the marker.

She loves using the scoop to play with the water and to rinse herself off at the end of her bath. Mr. Whale also stores other bath toys when not in use, keeping the bath tub a lot cleaner these days.:)

We've also had some fun with this batch of homemade finger paints. The recipe calls for a bit of dish soap, so they're perfect for bath time.

A makes shapes and letters on the wall--a great educational activity. And the nicest thing about it is that it washes right off when she's done playing with it.

Here's the recipe for you to try:

Homemade finger paints

2 tablespoons sugar
1/3 cup cornstarch
2 cups cold water
1/4 cup clear dishwashing liquid
food coloring (for vibrant colors, use food coloring paste)

Mix the sugar and cornstarch in a small pan, then slowly add the water. Cook over low heat, stirring until the mixture becomes a smooth, almost clear gel (about 5 minutes). When the mixture is cool, stir in the dishwashing liquid. Scoop equal amounts into containers and stir in the food coloring. Store in airtight containers.

Friday, April 8, 2011

Red Velvet Cake

A surprise birthday party was in the works for a while, and it finally happened. We really surprised our friend, Pat after church Wednesday night. Another lady, Shirley, put all of the refreshments together and Q asked A and I to make the dessert. She and I worked together on a red velvet cake. For a four-year-old, I thought she did well from start to finish. I think her favorite part was putting the frosting and sprinkles on with my help.

Here's a look at our finished creation....

The cake was enjoyed by all. With it's light chocolaty flavor and creamy frosting, it was perfect for everybody's palate.

And best of all, the birthday girl enjoyed her slice, along with the sweet fellowship of friends all around her.

And just in case you want to make this fun birthday cake, here's the recipe. It comes from Better Homes and Gardens Annual Cookbook from 2008.

Red Velvet Cake

3 eggs
3/4 cup butter
3 cups all-purpose flour
2 teaspoons unsweetened cocoa powder
2-1/4 cups sugar
1-1/2 teaspoons vanilla
1 1 ounce bottle red food coloring (2 tablespoons)
1-1/2 cups buttermilk
1-1/2 teaspoons baking soda
1-1/2 teaspoons vinegar
1 recipe Buttercream Frosting (recipe below)

1. Let eggs and butter stand 30 minutes. Preheat oven to 350 degrees. Grease and flour three 8x1-1/2 inch round baking pans; set aside. (I used two 9-inch pans and it worked well.)

2. In bowl combine flour, cocoa powder, and 3/4 teaspoon salt; set aside. In mixing bowl beat butter on medium-high 30 seconds. Add sugar and vanilla; beat until combined. Add eggs 1 at a time; beat on medium-high 30 seconds. Add sugar and vanilla; beat until combined. Add eggs 1 at a time; beat on medium after each addition. Beat in food coloring on low.

3. alternately add flour mixture and buttermilk to egg mixture; beat on medium-low after each just until combined. Stir together baking soda and vinegar. Add to batter; beat just until combined.

4. Spread in prepared pans. Bake 25 to 30 minutes or until pick inserted near centers comes out clean (cakes may appear marbled). Cool in pans on wire racks 10 minutes. Removed from pans; cool.

5. Prepare Buttercream frosting. Place one layer, flat side up, on plate. Spread top with 3/4 cup frosting. Stack layer, flat side up; spread top with 3/4 cup frosting. Stack final layer, flat side down; spread remaining frosting on top and sides. Makes 16 servings.

Buttercream Frosting

In saucepan whisk together 1-1/2 cups whole milk, 1/3 cup flour, and dash salt. Cook and stir over medium heat until thickened and bubbly. Reduce heat; cook and stir 2 minutes more. Transfer to bowl; cover surface with plastic wrap. Refrigerate until cooled (do not stir). In bowl beat 1-1/2 cups softened butter, 1-1/2 cups sugar, and 2 teaspoons vanilla on medium 5 minutes until light and fluffy and sugar is almost dissolved. Add milk mixture, 1/4 cup at a time; beat on low after each until smooth.

Tuesday, April 5, 2011

Oreo Stuffed Chocolate Chip Cookies

When I saw the recipe for these cookies here, I couldn't wait to make them. We had a spring snow on Sunday afternoon which gave me a good excuse to make these with A. We had a great time making these and eating them, too! We shared them with folks at church, neighbors and her teachers at school. You'll love them, too, but note that these cookies are HUGE! You'll probably want to share one with a friend. Enjoy!:)

Oreo Stuffed Chocolate Chip Cookies

2 sticks softened butter
3/4 cup packed light brown sugar
1 cup granulated sugar
2 large eggs
1 tablespoon pure vanilla
3-1/2 cups all purpose flour
1 teaspoon salt
1 teaspoon baking soda
10 ounce bag chocolate chips
1 bag Oreo cookies, double stuff (I used the store brand and they still worked great!)

1. Preheat oven to 350 degrees. In a stand or electric mixer cream butter and sugars until well combined. Add in eggs and vanilla until well combined.

2. In a separate bowl, mix the flour, salt and baking soda. Slowly add to wet ingredients along with chocolate chips until just combined. Using a cookie scoop, take one scoop of cookie dough and place on top of an oreo cookie. Take another scoop of dough and place on bottom of oreo cookie. Seal edges together by pressing and cupping in hand until oreo cookie is enclosed with dough. Place onto a parchment or silpat lined baking sheet and bake cookies 9-13 minutes or until cookies are baked to your liking. Let cool for 5 minutes before transferring to cooling rack. Serve with a tall glass of milk.

Makes about 2 dozen VERY LARGE cookies

This is how the cookies looked after baking....

And this is how one of them looked like after Q bit into it....

Lots of chocolatey goodness! By the way, these taste better warm than cold. :)

Thursday, March 24, 2011

Double-Chocolate Peanut Butter Pie

We had family visiting us in our home recently--Q's big brother, Ben, his son, Canon and Aunt Berdean. Since they were going to be with us a few days after Ben's birthday, Q thought it would be fun to have a special dessert just for him. He requested a peanut butter pie, but I didn't want to make it the traditional way--I wanted it to be a little different. So, I scoured the internet looking for just the right one. I found it here, and couldn't wait to make it!

Take a look at this scrumptious double-chocolate peanut butter pie....


Are ya drooling yet?

Here's the recipe just in case you need to make this today.;) Enjoy....

Double-chocolate peanut butter pie

4 ounces semisweet chocolate, chopped (1/2 cup)
1/2 stick unsalted butter, cut into tablespoons
8 ounces chocolate wafer cookies (9-ounce package), finely ground (2 cups)

8 ounces cream cheese, softened (1 cup)
1 cup chunky peanut butter
1/2 cup sugar
2 teaspoons pure vanilla extract
1 cup well-chilled heavy cream
3/4 cup salted roasted peanuts, chopped
Kosher salt

4 ounces semisweet chocolate, chopped (1/2 cup)
1/2 cup heavy cream

1. Make the chocolate crust. Preheat the oven to 375 degrees. In a medium glass bowl, combine the chocolate and butter and microwave at high power in 20-second intervals until the chocolate is melted. Stir well, then stir in the cookie crumbs. Press the cookie crumbs over the bottom of a 9-inch springform pan and 1-1/2 inches up the side. Bake the crust for 10 minutes, or until set; the crust will continue to firm up as it cools.

2. Meanwhile, make the peanut butter filling. In a large bowl, using a handheld electric mixer, beat the cream cheese with the peanut butter, sugar and vanilla extract until blended. In another bowl, using the same beaters, whip the chilled cream until firm. Fold one-third of the whipped cream into the peanut butter mixture to loosen it, then fold in the remaining whipped cream and 1/2 cup of the chopped peanuts. Spoon the filling into the crust, smoothing the surface. Sprinkle lightly with salt and refrigerate until set, about 3 hours.

3. Make the chocolate topping. In a medium glass bowl, combine the chocolate with the heavy cream and microwave at high power in 20-second intervals until the chocolate is melted and the cream is hot. Stir the chocolate topping until blended, then let cool to barely warm, stirring occasionally.

4. Spread the chocolate topping over the peanut butter filling and refrigerate until just firm, about 15 minutes. Sprinkle the remaining 1/4 cup of chopped peanuts around the edge of the pie. Carefully run a thin knife around the pie crust to loosen it, then remove the outer edge of the pan.

Ben sure loved his pie, and I know you will, too!:)

Wednesday, March 2, 2011

Peppermint laundry soap

When I found the recipe for this laundry soap here, I knew I just had to try it. Peppermint is such a refreshing scent. I've done some loads with it already, and this recipe is a keeper.

Peppermint Laundry Soap
(makes approximately 5 cups)

2 cups finely grated castile soap (1-1/2 .5 ounce bars makes about 2 cups; Dr. Bronner's Peppermint Castile soap is divine!)

1 cup borax

1 cup baking soda

1 cup soda ash (washing soda)

Mix everything together and store in an air tight jar. Use 1/8 cup per load. Before using, give jar a shake to prevent soap flakes from settling on the bottom.


Friday, February 25, 2011

Rhubarb-banana muffins

A few days ago, I was looking through my cookbooks to find a new recipe. I had some ripe bananas that I needed to use up. I found a recipe for rhubarb-banana muffins in my Better Homes and Gardens Annual Recipes Cookbook (from 2008) and knew I had to try it out. We were not disappointed--they are delicious!

They are moist and sweet, especially with that sugar topping--yum! Enjoy.:)

1/2 cup granulated sugar
2 tablespoons butter, softened
2-3/4 cups all-purpose flour
2 teaspoons baking powder
2 teaspoons ground cinnamon
1/2 teaspoon baking soda
1/2 teaspoon salt
2 eggs, beaten
1 cup packed brown sugar
1 cup mashed banana (3 large)
1/2 cup cooking oil
1-1/2 cups frozen chopped rhubarb, thawed and drained

1. Preheat oven to 400 degrees. Lightly grease 24 muffin cups or line with paper bake cups. In bowl combine granulated sugar and softened butter. Using your fingers, combine until crumbly; set aside.
2. In large mixing bowl combine flour, baking powder, cinnamon, baking soda, and salt. Make well in the center; set aside.
3. In medium mixing bowl combine eggs, brown sugar, mashed banana, and cooking oil. Add egg mixture all at once to dry mixture. Stir just until moistened (batter should be lumpy). Fold in rhubarb.
4. Spoon batter into prepared muffin cups, filling each two-thirds full. Sprinkle with granulated sugar mixture. Bake about 18 minutes or until toothpick inserted in centers comes out clean. Cool in muffin cups on a wire rack 5 minutes. Remove from muffin cups; serve warm.

Friday, February 18, 2011

Homemade oreo cookies

When I found the recipe for these here, I knew I had to try them! I made the filling pink, too--perfect for Valentine's Day!

Q and I both loved these a lot! They are scrumptious. Enjoy!:)

Homemade Oreos

makes 25-30 sandwich cookies

For the chocolate wafers:

1-1/4 cups all-purpose flour
1/2 cup unsweetened Dutch process cocoa (Hershey's Special Dark is highly recommended)
1 teaspoon baking soda
1/4 teaspoon baking powder
1/4 teaspoon salt
1-1/2 cups sugar
1/2 cup plus 2 tablespoons room-temperature, unsalted butter
1 large egg

For the filling:

1/4 cup room-temperature, unsalted butter
1/4 cup vegetable shortening
2 cups sifted confectioners' sugar
2 teaspoons vanilla extract
optional-gel dye

1. Set two racks in the middle of the oven. Preheat to 375 degrees.

2. In a food processor, or bowl of an electric mixer, thoroughly mix the flour, cocoa, baking soda and powder, salt, and sugar. While pulsing, or on low speed, add the butter, and then the egg. Continue processing or mixing until dough comes together in a mass.

3. Take rounded teaspoons of batter and place on a parchment paper-lined baking sheet approximately two inches apart. With moistened hands, slightly flatten the dough. Bake for 9 minutes, rotating once for even baking. Set baking sheets on a rack to cool.

4. To make the cream, place butter and shortening in a mixing bowl, and at low speed, gradually beat in the sugar and vanilla. Turn the mixer on high and beat for 2 to 3 minutes until filling is light and fluffy. (Optional: Blend in a tiny bit of gel dye until you reach the desired color.)

5. To assemble the cookies, in a pastry bag with a 1/2 inch, round tip, pipe teaspoon-size blogs of cream in to the center of one cookie. Place another cookie, equal in size to the first, on top of the cream. Lightly press, to work the filling evenly to the outsides of the cookie. continue this process until all the cookies have been sandwiched with cream. Dunk generously in a large glass of milk.

Friday, February 4, 2011

Super Bowl party cake

In my first two years of teaching, the Denver Broncos made it to the Super Bowl. So, it was fitting that my class and I have a party on the Friday before the big day. The students wore their favorite team shirt, had a football game during recess and enjoyed some cake at the end of the day.

Here's a pix of my first class of third graders on our fun day:

The cake was fun and simple to make, but best of all, it tasted great! The following recipe card came in a mailing and was put out by the company that makes Cool Whip. The entire cake is covered in the sweet stuff then decorated.

Here's the recipe and directions on how you can make this football cake. It will be fun to enjoy on Super Bowl Sunday or on any other big game day! Have fun!