Showing posts with label sewing. Show all posts

Friday, January 11, 2013

Kit's box and nightie

I love surprises, don't you? I think I actually like being the one who surprises more than the one who is surprised. Alyzza has been wanting pajamas for her doll, Kit, but because I was already planning on making her one for Christmas, I down-played it any time she brought it up. And what better way to present this gift than to put it in a special box where all of the other doll clothes and accessories would go in, too.

And boy, was she sooo surprised when she opened up the box!

It's hard to see, but I hand-painted the top of the box with her initials and on the inside, lined it with felt.

Look at that look of surprise....

....and a hug for Mom!

She totally loves it, don't you think?:)

Here she is with her cousin, Annalina, who has another American Girl doll, Kaya. The girls enjoyed playing with their dolls together during Christmas break. And there's Kit with her nightie on--so cute!

This makes my heart smile.:)

Thursday, November 15, 2012

A very happy 60th anniversary!

Not too long ago, we had a celebration for a couple in our church--they reached a milestone--60 years of married bliss. To honor them, Quentin decided to dedicate a service to them and to have a party afterward. I worked on decorations and Alyzza helped me decorate. I decided to go with a fall theme; it looks pretty at this time of year, plus we could keep it up until our Thanksgiving potluck.

Here's what we did to give the Sander's a super celebration....

These felt circle garlands came out sooo cute; it gave me a good excuse to do some sewing again! I found the basic idea here and I just love it!

Pretty garlands make me happy!:)

We used the fabric pumpkins we made last year for centerpieces. Laying these out with some Dollar Tree leaves were the perfect project for Alyzza.

This simple bulletin board was easy to pull together. I stapled cardstock up there and had a couple of pens nearby for church friends to write the Sander's a note.

The pens were placed in a paper pocket that I stapled to the board.

This beautiful cake was made by Janis, another church member who we adore (she loves doing special things for our girls, too, and we appreciate that so much).

Congratulations, Dr. and Mrs. Sanders!

Quentin wanted to give them gifts during the service, and one of his ideas was to give Mrs. Sanders a bouquet of flowers. I had just stumbled across this idea for a fall bouquet, and knew this would be the perfect gift for her. She absolutely loved it. (I hope to make one of these soon for us, but it will get greater use next fall.) Quentin also gave the Sanders a large-print New Testament and had their names engraved on it.

All in all, it was a great celebration. To God be the glory for a tremendous example of love and ministry. Thank you, Dr. and Mrs. Sanders; we appreciate you.

Wednesday, November 7, 2012

Pretty in yellow

A few weeks ago, it was Spirit Week at Alyzza's school. We looked at the themes of each day and everything looked fine--except for the fact that Alyzza did not have anything yellow to wear for her class color day. We kept brainstorming on what to do so that she could participate. One of my ideas was to look for yellow polo shirts at Goodwill (or even find a white one and dye it yellow) for her to wear. 

Well...an idea hit me when I was out shopping one day. I found a ladies yellow sleeveless tank at the Dollar Tree. Surely, this could be turned into a dress, right? Next door to the Dollar Tree is Goodwill, so we always have to go in and take a look. :) There, I found a men's yellow polo shirt for $2! So far, so good--$3 for a fun yellow dress is awesome!

Well, after some tweaking and sewing, here's the dress I made for Alyzza. She was sooo excited when I showed it to her.

I had just a tiny bit of fabric left over from the men's shirt after making three ruffles each on the top and bottom of the dress. For school, she needed to wear a polo underneath it, but if it still fits her by next spring or summer, she could go sleeveless with it.

Making this dress for Alyzza reminded me of the many times my mom sewed something up for us for a school event. Sometimes, she worked late into the night and early the next morning to make sure that something was ready to go. I've always appreciated that about my mom; she's such a hard worker and puts so much creativity into what she does.

 Thanks, Mom, for instilling that desire in me. I'm now enjoying making things for my girls.

Thursday, January 12, 2012

Simply cute and whimsical

This year for Christmas, the girls were flooded with gifts from family and friends. This was our first year as parents, so it was fun to see their reactions as they opened up their gifts. As you all know, I love giving and receiving handmade gifts. They are so special and heartfelt. When A opened up the package that contained these aprons, she was ecstatic!

She's been wanting an apron to use when she cooks and bakes with me so this was awesome! The smaller apron is for Little S, but she is not too sure what to think of it right now. They came from my youngest sister, who made them with the help of our mom. She chose the best colors, which I am in awe of. Great job, Raquel!

I really like the pleats at the top of the biggest apron.

This patchwork bird applique' is sooo adorable!

There were a few places where the stitching was done in a curvy fashion. I love all of the details, time and effort they put into these. They will definitely be something I will not part with when the girls outgrow them either. They will make great heirlooms.:)

Friday, June 24, 2011

T-shirt capes

This past spring, two of our nephews and one niece turned two years old. Since I painted t-shirts for Eli, Carson and Josie's first birthdays, I thought it would be fun to come up with another t-shirt creation this year, too.

After some thought, the t-shirt cape idea came to be. I'm sure there are different variations out there, but perhaps these pictures will inspire you to make these fun and simple t-shirts for the little ones in your life.

First up--Josie's t-shirt cape....

For each shirt, I cut out their monogram out of fabric that I also used for the cape. I first glued the letters with fabric glue, let it partially dry, then stitched them with the machine.

I also stitched this three-layered heart on the back that matched the polka-dots on the fabric.

Eli's shirt is next....

I was glad to find awesome plaid fabrics for both boys' shirts.

Because boys really like to be superheros, the lightning applique' on the back was perfect.

Last but not least is Carson's t-shirt...

And just like Eli's, the lightning bolt on the back really stands out!

Each cape was slightly longer than the length of the shirt. It was hemmed all the way around. Then, I stitched velcro to the top corners of each cape and at the shoulders of each shirt.

To help you see what these shirts look like in action, my sil, Abigail, sent me a couple of pictures of Carson wearing his.

Doesn't he look awesome with that hat on, too? (So cute!)

All three kids are having fun playing in their t-shirt capes. Perhaps this is something you can do for the young ones in your family. It's such a perfect time to do it, too! Summer is full of imaginative play!

Happy Sewing! :)

Wednesday, May 25, 2011

Her long-awaited dress

A few weeks ago, I showed A a picture of a pillow case dress. I was asked by a friend at church to make a couple of them and it was finally time to make them. A asked if I could make one for her, too. I found an old pillowcase (that had some pink in it, of course!) to use. I set all the pillowcases aside and got busy with other things. But--she knew a dress was coming her way some time soon.

Not long after that, A said something to me that was so cute. I was reading some crafty blogs and she peered over my shoulder. She saw a picture of a little girl wearing a handmade dress. She asked me what it was all about. I said, "Her mommy made her that dress." Then she said, "Like you're making me one." Of course my heart melted. ;) I've always wanted to make dresses for my daughter, and this opportunity to make one for my foster daughter is special to me.

This past Saturday, I set to work on the three dresses and A was so excited! She even helped me figure out where to put the trim and to make a letter "a" for the dress.

Adding the rick-rack to the top and bottom of the dress was a special touch.

She really likes that appliqued "A" that stands for her name.

She could not wait to wear it, so she wore it to church on Sunday. She enjoyed all of the compliments from everyone at church, too. I loved making this dress for her; it was something I always wanted to do. And I know that she'll remember it, too. It makes my heart smile.

Wednesday, March 9, 2011

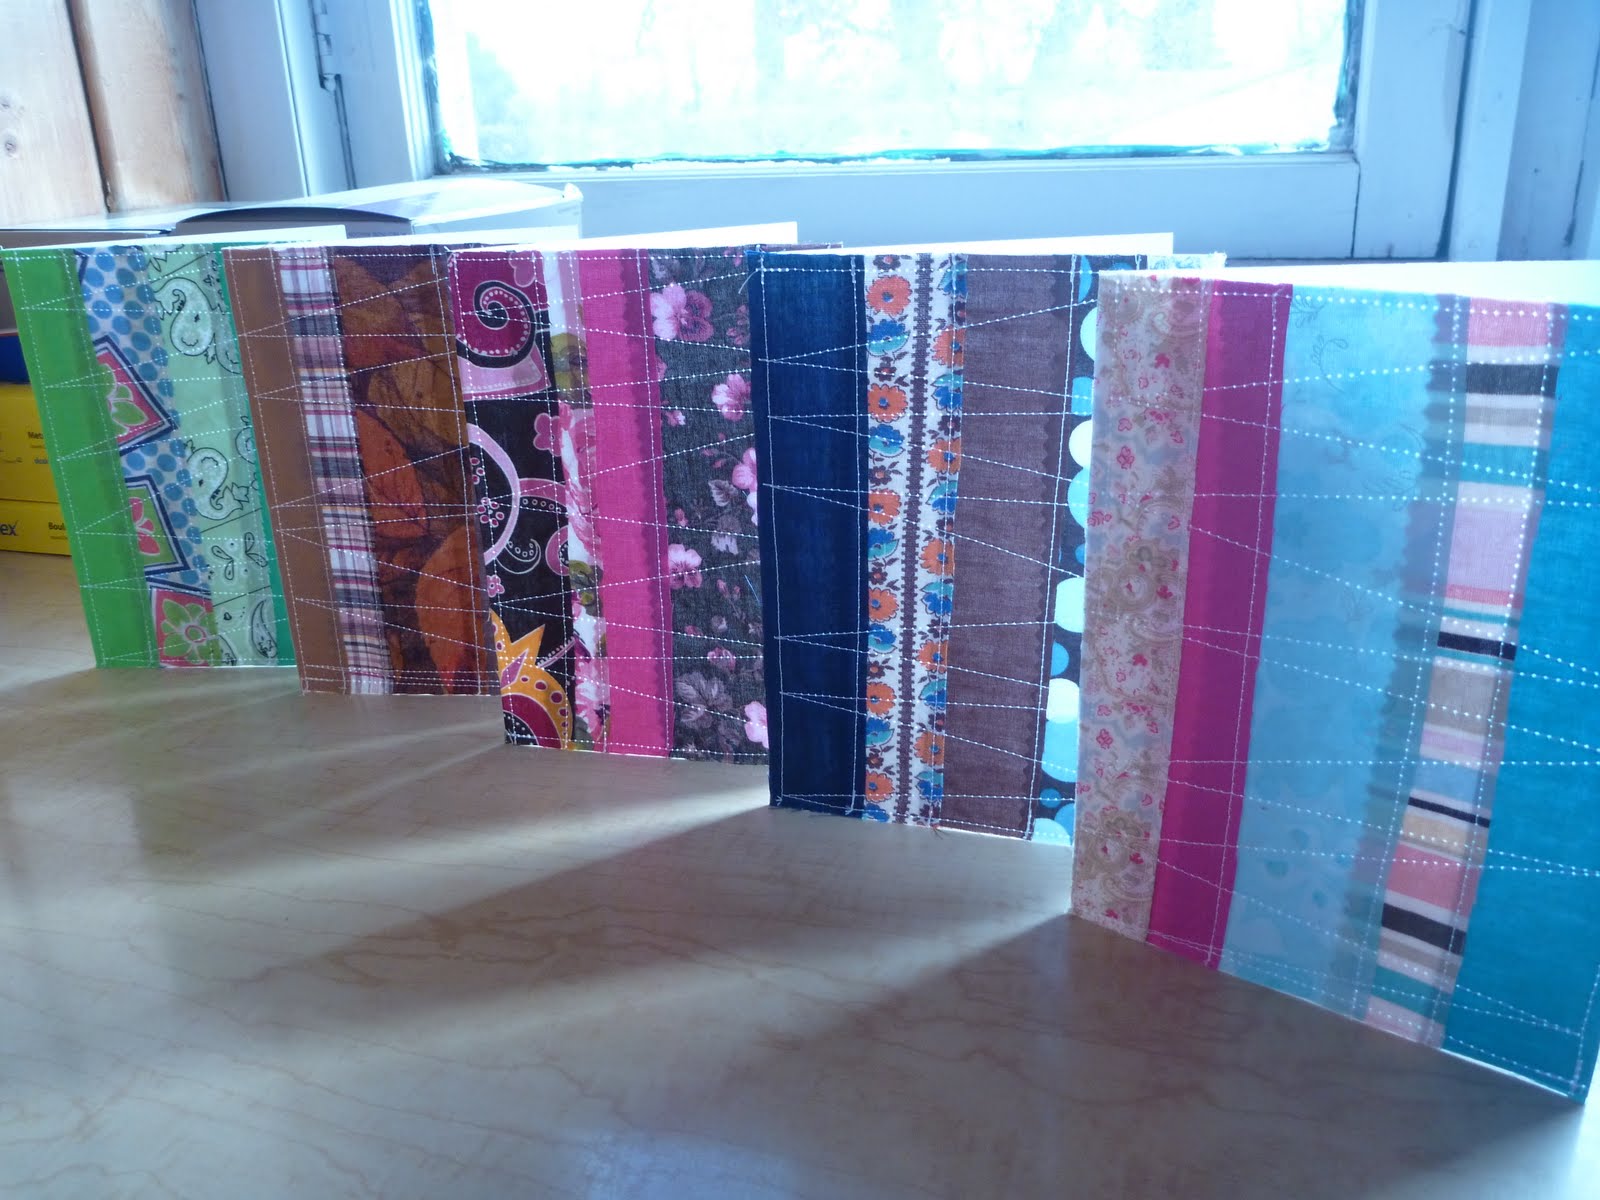
Quilted note cards

Several months ago, I bought a fun sewing kit called the Quilt-it Kit, by Denyse Schmidt. Inside, there are fifteen quilt and patchwork projects for both the beginner and advanced crafter. Last fall, I knew it was time to make something out of this kit, so I made the Dis-cards. They are note cards with fabric scraps sewn on them. I made some for my mom, but couldn't take a picture of them because I had just lost our camera.

Thankfully, I had another reason to make more--my sister and sister-in-law's birthdays. They both loved them a lot. My sister said, "They are too pretty to use!" And I agree. I really like these, although I haven't made any for myself yet. I just have to find the time, right?:)

For each card, I laid out five strips of fabric that went well together. I found that if I put in a couple of solid colored strips, then the overall look of the card didn't look too busy with patterns.

When you start stitching on the pieces, go from right to left, stitching each one vertically and overlapping the next one on top of the one you just did (and don't forget to stitch that last piece on both sides!). Also, use a regular size stitch, as stitches too close together will tear the card apart. After stitching on each strip, sew some zig-zags starting at the top and going from side to side until you get to the bottom. Trim the excess fabric around the sides...and that's it--a pretty quilted note card.

This card is a mix of blues and pinks. The three patterned fabrics were used for the apron I made my sil, Abigail.

There are lots of browns in this one, with just a bit of blue.

This card really stands out with all that green!

This picture shows the last two cards I made for each gal--pink and brown and then a blue and brown mix. I wrapped up all five cards in a ribbon before sending them off.

I really liked this project as it didn't take me a long time, like most of my sewing projects do. Several cards can be done in an afternoon, and I love the satisfaction of that.

Have fun creating this simple project for the special ladies in your life. Happy sewing!:)

Monday, March 7, 2011

A box of treasures

This past week, I got an email from our church pianist, Shirley, asking me if I'd like to have a BIG box full of crafting treasures. Of course, I said, "yes" and on Sunday morning, I received the goods.

The first thing I pulled up was a bag that had a baby quilt inside. It just needs some embroidery work to finish it. Then, I pulled up this tin...

...lots of beads with awesome possibilities!

These pipe cleaners were a neat find. Whenever these were sold, they cost just ten cents a bag. I couldn't get over how thin they were compared to how thick some of the ones you can buy today are.

I went crazy over all of the rick rack, bias tape, and seam binding packages!

I was also super excited to see this Wilton decorating tip case. I haven't done a lot of decorating with the few tips I already had, but this got me to thinking that I ought to dive in again and have some fun. Along with these were an assortment of other cake decorating items.

Thanks, Shirley, for your fun box of treasures. Can't wait to really get crafting again!:)

Wednesday, January 26, 2011

Toddler pillowcase dress

After I made my first two pillowcase dresses, I brought them to church to show a few of the ladies. One of them asked me if I'd be willing to make one for her great-granddaughter for a Christmas present.

I bought Simplicity pattern 2383 to make a size two pillow case dress. I went shopping with Mary to choose fabrics for the dress, since we didn't have a pillowcase to start with. After a few days and several hours of work, this is how it turned out:

My favorite part of the dress is the applique'. I think it turned out so cute! This little girl will look adorable wearing this in the summer time.

The ladybug's legs and antennae are made from ribbon looped together. The stitching was done on my machine, except for the eyes.

I would love to make another dress like this, but don't have the opportunity yet! Since we have two little boys now, I've been trying to think of things I'd like to make for them. However, that will have to happen once I get more of a routine down--I've not done any sewing since their arrival...oh well...

Tuesday, January 25, 2011

Three-in-One gameboard: the game pouches

I made the game pouches using some material I had on hand, including a couple of pairs of jeans that were used for the pockets.

Since most of the hemming was already done on the denim, the pockets were so easy to put together. Each pocket was labeled so that the pieces would go in the right place when they were not being used.

The pouches themselves were just two pieces sewn together with one side being longer than the other for a flap. The flaps were secured with velcro.

I also put velcro on the inside of each pocket so that the pieces wouldn't fall out. These pouches will hold everything together and keep the game board clean.

Well, that's the end of my biggest project for Christmas! Coming up...a couple of more easy projects that are fun to make!:)

Thursday, November 18, 2010

Annalina's pillow case dress

My niece, Annalina, celebrated a birthday earlier this month, so I made her a pillow case dress using Simplicity pattern 2391. You may remember that I made a couple of them before using tea towels. She was one happy girl when she pulled it out of the box! Her mom took a couple of pictures for me so that I could see it on her and share it with all of you...

I made her a size 8 so that she can grow into it by next summer. The arm openings are a bit big, but she can wear a t-shirt under it, or even a sweater on top! With the weather being cooler now, these are great options.

There's something more to this dress that is so special to me and Q's side of the family. I received the pillow case with another one just like it from my mother-in-law this summer. Abigail brought it along with a few other vintage items that belonged to her grandmother. So, this beautifully embroidered pillow case from Annalina's great grandmother was transformed into a priceless heirloom.

I am holding onto the other pillow case because Annalina may have a new cousin that will wear a matching dress! I hope God gives us a little girl (and a little boy, too) in the near future. You never know, she might be wearing this handmade dress next summer....

....made especially by her mama.

Friday, October 22, 2010

Finally, an organized sewing nook!

For months, I've not liked the looks of the shelf in the craft room. And lately, it's become more disorganized and has been driving me nuts! It has not been very "workable" as a lot of my tools and notions were hidden in a couple of clear storage containers. I had to do this in our condo, as the kitchen table served as my sewing table. I could just pull out what I needed and set to work.

But now, in a bigger space, with more notions and patterns and things, I've needed to do something with all of my sewing stuff.

Here's the before picture:

And here's the after--much better, I think!

I found the collapsible crates at my local Dollar Tree. Only two of the sizes worked for this shelf. At close to three feet wide but only 7-1/2 inches deep, I was limited to the boxes I could fit on there. I'm still happy with the results! Everything has its place. In fact, my patterns which were hidden in a cupboard, are now easily accessible.

Each of the boxes holds the following: top row-- extra notions like extra elastic and maternity panels, second shelf-- thread and bobbins, ribbon, tools (tracing paper, measuring tape, pins, needles, etc.), third shelf-- zippers and quilting/sewing kits, bias tape, lace and eyelet trim, bottom shelf--fusible web/iron-on transfers and two boxes of patterns.

These canning jars add lots of color with the contents they hold. They hold rick-rack, buttons, small embellishments, scrap trim and ribbon, velcro, elastic, snaps and fasteners, and my scissors.

After organizing all of my tools and notions, I had to do something with my fabric! With all of the fabric that a couple of friends recently gave me, I had to find room in one of the built-in cupboards in that room. I moved all of the craft and knitting supplies into another cupboard, and was able to fit all of the fabric (except for the big bolts of satin) into one space!

Take a look...

I organized by color for the most part. There were a few pieces that just didn't fit into a color category, so they are stacked neatly on top of the denim, black and white pieces. The bottom area also holds some flannel and fleece. One box contains current projects (or ones I want to do) and the other one is full of scrap fabric. I'm so excited that I now can work with my stash more easily. Before, most of it was stashed into boxes--no fun!

Hope this gives you some ideas on organizing your stash of sewing supplies. If you already have organized your things, what ideas can you give that I haven't already? I'd love to hear them.:) Happy sewing!