Showing posts with label crafts. Show all posts

Wednesday, January 16, 2013

Gabriel's gift

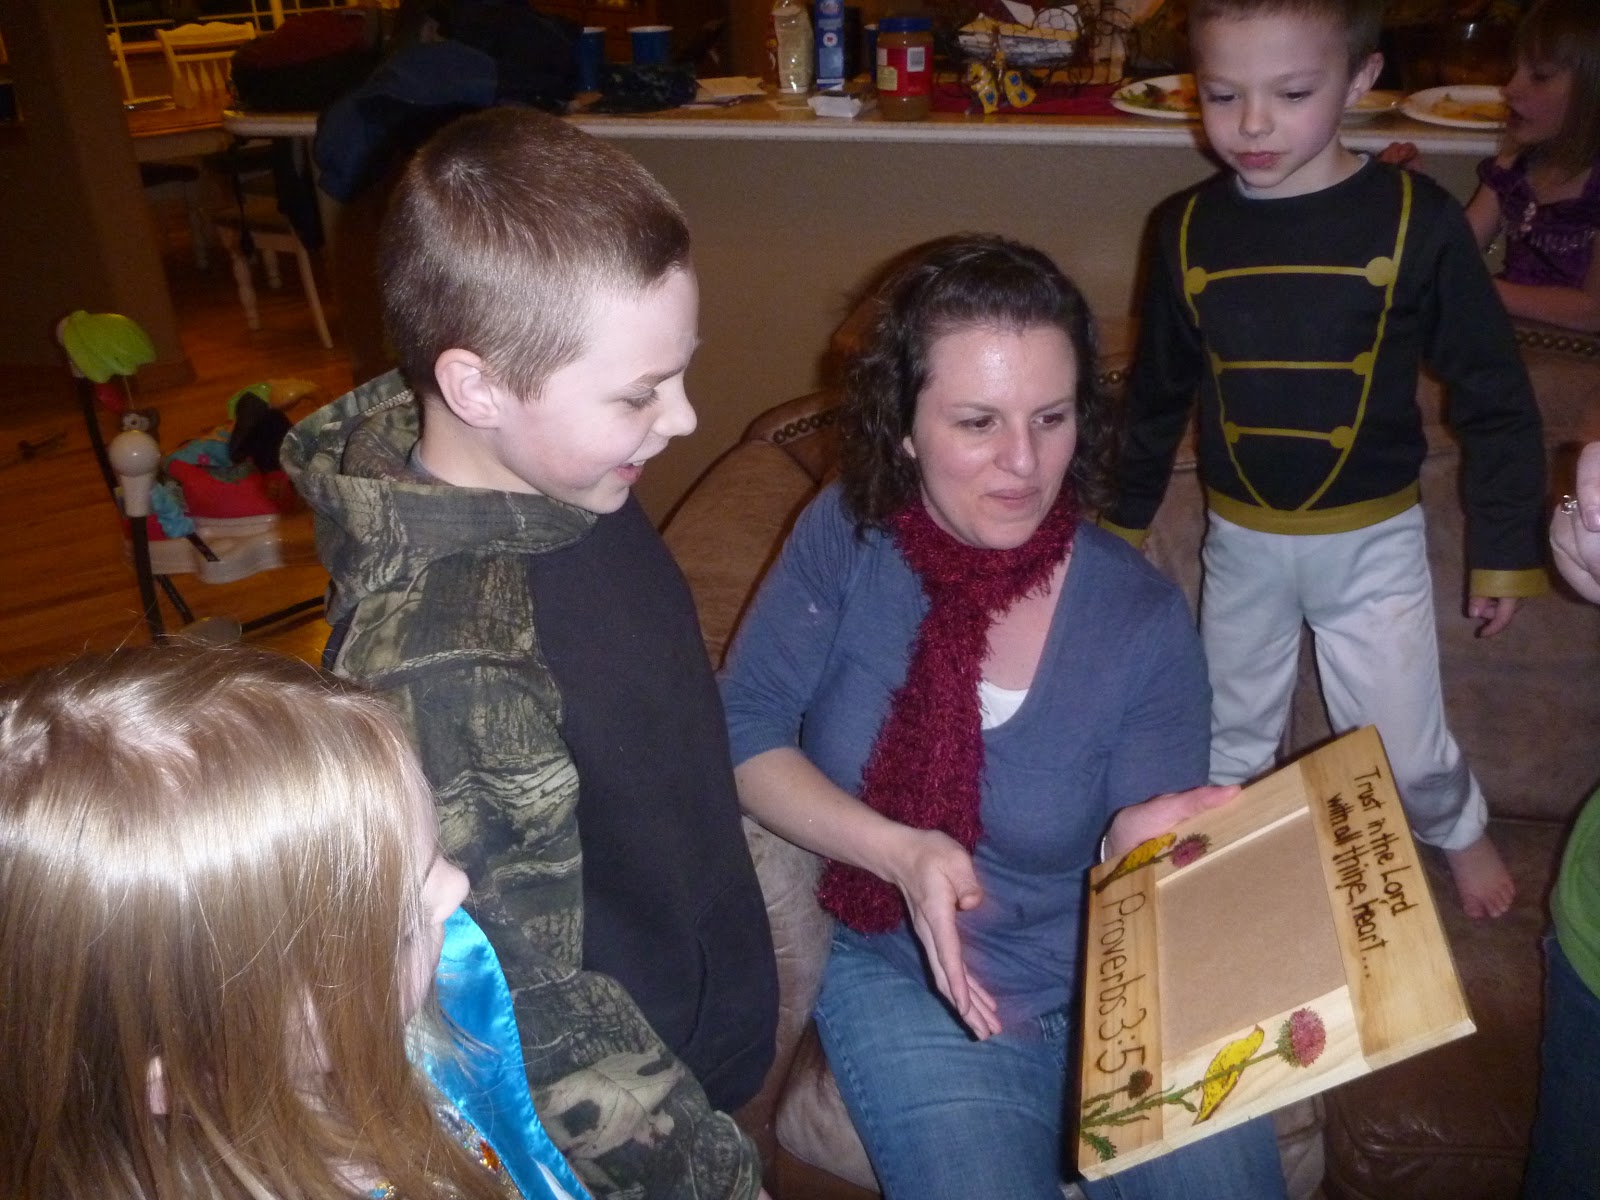
In the midst of all my gift-making for family and friends, I received a special hand-made gift from my nephew, Gabriel. He's been getting really creative with a certain type of craft, which you'll see below. I think it's great!

From the moment we arrived that day at his house, he kept mentioning that he was still working on a gift and that I was not to go into a certain part of the house. Then, after a long day of playing and hanging out, it was time to open presents. Gabriel's eagerness could not hold out any longer, so I was the first one to receive a gift--his gift of love.

He did some wood burning on a frame, and I love it!

On it, it says, "Trust in the Lord with all thine heart," Proverbs 3:5. This is one of my favorite verses.

Thank-you, Gabriel...I will treasure this gift always!

He also made some ornaments for a few others, including this one for Quentin. Isn't it awesome?

Coming up...one last gift I made for each family...I can't believe I forgot about this...it is SO. MUCH. FUN!!!

Monday, January 14, 2013

Abigail's scarf

There's somewhat of a craze right now with repurposing items into other things, and it's fascinating to me. Not too long ago, I learned how to make a t-shirt scarf (a picture of that one will be coming next month because I'm doing it for a M.O.P.S. craft). Anyway, there was another style that my sister-in-law and I really liked but had not yet learned how to do. I found the link to a video tutorial here and I learned how to make it. It was so much fun! 

In fact, I made one before I made Abigail's for a M.O.P.S. Christmas party. We had an accessory exchange for one of our games that night. My scarf was exchanged three times and all three gals who "owned" it loved it a lot!:) The last gal got to really keep it, but I've thought about making one for the other two ladies some time. I know they would be so surprised. 

Abigail really likes navy blue, so that's the color I used. I also made a felt flower pin for it if she'd like to pin it to the side. You really must check out the link above as it shows how it drapes so beautifully on a person. I have got to make one for myself one of these days, too! It's a simple craft that gives instant gratification to the maker and receiver. 


Not only did Abigail love it, but her kids seemed to like it as well. :)

Friday, January 11, 2013

Peek-a-boo house

When I saw the idea for this baby toy, I knew I had to make this for my nephew, Jedidiah. It is so fun and adorable and I enjoyed every minute making it. I actually made it on the day we spent with he and his family, and while I worked two of his older brothers watched. They are really into crafting, too.


This craft uses scraps of felt and recycled materials like cardboard and flip-top lids from wipies! Take a look below....


Isn't that such a novel idea? Behind each large window and door, I taped on pictures of his brothers and sister and his cousins on the Johnson side of the family.


To protect the pictures, I used packaging tape instead of regular tape. The rest of the house was constructed using hot glue. I knew that little hands are eager to pull things, so I wanted to make sure nothing would fall apart (or at least I hope it doesn't right away!).


Most of the kids gathered around Jedidiah showing him how to play with the toy.  We all had a blast watching him...isn't he just the cutest little guy?

Kit's box and nightie

I love surprises, don't you? I think I actually like being the one who surprises more than the one who is surprised. Alyzza has been wanting pajamas for her doll, Kit, but because I was already planning on making her one for Christmas, I down-played it any time she brought it up. And what better way to present this gift than to put it in a special box where all of the other doll clothes and accessories would go in, too.

And boy, was she sooo surprised when she opened up the box!

It's hard to see, but I hand-painted the top of the box with her initials and on the inside, lined it with felt.

Look at that look of surprise....

....and a hug for Mom!

She totally loves it, don't you think?:)

Here she is with her cousin, Annalina, who has another American Girl doll, Kaya. The girls enjoyed playing with their dolls together during Christmas break. And there's Kit with her nightie on--so cute!

This makes my heart smile.:)

Thursday, January 10, 2013

Handprint t-shirt

Little S and I made a gift for Daddy, using materials we already had. We grabbed one of his t-shirts and paint to create this special memory.


I painted her hands with white craft paint. Then, using fabric paint, wrote, "I Love you, Dad....then her name with the year.

Super cute and easy! I love memory-type crafts, don't you? 

Framed Christmas Carol Print

This gift was fun to give to a couple of gals this year! You can find the free printable here, then print on card stock and frame it however you choose. I decided to put a red border around it by gluing the print onto red card stock. The frame and star (it was an ornament; just used some glue to keep it in place) were both from the Dollar Tree, so not only is this decoration so pretty, it's pretty affordable, too! 


Bird Nest Necklace

Don't you love Pinterest? It's a great place to find lots of ideas! When I was looking for ideas for M.O.P.S. crafts, I came across this beautiful bird nest necklace. I knew it would be too difficult to do in a large group setting, so I did it with the steering committee at our retreat. It was a huge hit! 

So....since then, I've made one for my sister-in-law, myself and the other ladies in the family. For Christmas, my sisters, Raquel and Sonia, my mom, and mother-in-law, all received this personalized handmade gift. My mother-in-law chose the colors she wanted while we were together in Tennessee, but for the others, I chose colors and the amount of beads to represent each of their children. Not only did this make a great Christmas gift, but it could be made for Mother's Day as well.

I haven't had a lot of experience with making jewelry, but the tutorial here was wonderful! I felt like I accomplished such a gorgeous piece without lots of hassle. Enjoy!


Alyzza's gift for her teacher

Here's Alyzza's gift for her teacher: a washer necklace. I've seen some tutorials on the web, but when I saw one in Family Fun Magazine, I knew it could be something Alyzza could make for her teacher. She loved it a lot and knew that Mrs. G. would love it, too!


She painted the washer with finger nail polish. After the paint dried, she did another coat of clear nail polish. She selected the ribbon, and I tied it onto the washer. She gave it to Mrs. G. during her class Christmas party. She said that her teacher really liked it--and I'm so glad!

Angel towels

This year for Christmas,  I wanted the girls to make something for their teachers. When I found this idea for angel towels, I knew this would be the perfect gift for Little S' nursery workers and M.O.P.S. teachers.

We had a lot of fun making these. In fact, it was our first real craft to do together. On a clean garbage bag, I put all of the towels (six in all) on top, ready for assembly-style crafting. We stamped a hand at a time, then her foot, all the while giving her an M&M as we completed each step. Then, I finished the angels by painting on their heads, halos and the phrase, "Angels we have heard on high." You could also write, "Hark, the herald angels sing."

Take a look....and by the way, we ended up making more towels for the grandparents and a set for us. The second time, we included Alyzza in the process, so now some of us have precious memories of both girls from Christmas 2012.


Wednesday, January 9, 2013

Cupcake liner Christmas trees

Every year, our church has a Christmas party that my husband puts together. There's always great food, fun games, a gift exchange and lots of laughs! I've always enjoyed decorating for it each year as well. I like to pull in some help from others, and this year, it ended up being that Alyzza was my special helper. 

We made these super cute cupcake liner Christmas trees:

I bought cupcake liners at the Dollar Tree and Walmart and used styrofoam tree forms for the large ones and card stock to make the tree form for the small ones.

Some of the packages included cupcake toppers, so for some of the trees, I put those on the top. It took us a few hours to make fifteen or so of these, but it was a fun project I enjoyed doing with my big girl.:)


Wouldn't this be an awesome thing to do for a Valentine's Day event as well? You could use red and pink cupcake liners and still put some fluff around it to represent snow since it's a winter holiday.

For the step-by-step on how to make these go here. Have fun!:)

Friday, November 30, 2012

Our Thanksgiving Weekend

It is hard to believe that Thanksgiving has come and gone...and that the Christmas season is here! Here are some fun activities and crafts we did over the Thanksgiving holiday.

I found these paper place mats at Target for the girls to do before breakfast one morning. They had fun coloring the turkey, doing a maze, unscrambling words and writing down what they were thankful for.

Of course, Little S just scribbled away (we didn't know what she was writing, but I'm sure she did). She had a crayon in one hand while holding a spoon in the other!

Alyzza made this costume at school and had fun wearing it all weekend.

I don't remember what spurred this idea on, but I ended up doing a quick craft for Q and Alyzza. I made these rubber band shooters out of dowels and clothespins (a fantastic idea from Family Fun). They had a blast, and of course, some of us got caught in the middle of it all (I need to make one for myself, too!)

a close up view of this fun, handmade toy

I found this banner at Target, too. A couple of weeks before Thanksgiving, we started these links of thankfulness.:) It was fun to see what the girls would say. Little S said she was thankful that Jesus gave her water and then said almost the same thing about milk the next day. It was too cute!

Little S and I went on a short walk and gathered the best pine cones we could find.  I made this trio of owls for her. She chose the craft out of a fall-themed Family Fun book that my secret sister at MOPS gave me. Alyzza chose the craft below out of the same book. If you haven't noticed already, I really like Family Fun. It is the source of so many of our creative endeavors around here.:)

Here is Alyzza's pilgrim pal. We started off working together, but then I had to finish it later because we ran out of time. He is made out of a toilet paper tube, felt, yarn, pipe cleaners, colored paper and a bit of aluminum foil.

On Thanksgiving morning, Q read the story of Squanto to the girls (and yes, that's a bow in Daddy's hair, compliments of Alyzza).

After nap time, we drove to Loveland to have Thanksgiving dinner with Q's cousin and her family. This acorn squash with beet soup was the appetizer. After that, we had so many dishes to choose from to complete our meal. And of course, we kept some room in our bellies to enjoy some pie. We all had a fun time together and hope to get together again before too long.

A family tradition we have is to set up the Christmas tree and decorations the day after Thanksgiving. The girls were so excited and helped Daddy put the ornaments on, while I put out some of the other things. Do you want to see how it all turned out?

Come back soon and find out!:)

Tuesday, November 20, 2012

The Little Nativity Family

Last week, we did another craft at our M.O.P.S. group. Because we wouldn't meet up again until after Thanksgiving...and some of us like to decorate for Christmas the day after that, I thought it would be a good idea to make this little wooden spool nativity set:

 Some of you have seen a couple of the other sets that I've made in the past, so this one isn't much different. It took me a few tries to realize that the best fabric for the head coverings was felt. We also used fine-tipped Sharpie markers for the head details and used the yarn for the bodies.

I found this stable at the Dollar Tree right before we did our craft, so it was a neat thing to show the ladies how they can complete their set. I made a star out of craft foam and glued it on the top. You can also add some animals from a barnyard play set, as well as other wooden people to represent the shepherds and angels.

For the most part, I thought the craft went well. I had to set up the steps on two tables, so the ladies made their sets in assembly-line fashion. I only wish that we had more time though and that I could have set up more glue guns to keep the line going faster; those were the main problems that I did not foresee or have control over...oh well. However, the last group that went had ladies who were so understanding and they loved the craft so much they thought they could enjoy making it at home with their kids. That made me happy.:)

The girls have played with our set a couple of times already. Little S loves the baby Jesus story already and enjoys singing, "Away in a Manger." Two days ago, she played with the set and lost baby Jesus, so we'll hope and pray he returns to the stable soon!:)

Coming up soon...Thanksgiving activities this year....and as time permits some random Christmas gift and organization ideas! Stay tuned....

Thursday, November 15, 2012

A very happy 60th anniversary!

Not too long ago, we had a celebration for a couple in our church--they reached a milestone--60 years of married bliss. To honor them, Quentin decided to dedicate a service to them and to have a party afterward. I worked on decorations and Alyzza helped me decorate. I decided to go with a fall theme; it looks pretty at this time of year, plus we could keep it up until our Thanksgiving potluck.

Here's what we did to give the Sander's a super celebration....

These felt circle garlands came out sooo cute; it gave me a good excuse to do some sewing again! I found the basic idea here and I just love it!

Pretty garlands make me happy!:)

We used the fabric pumpkins we made last year for centerpieces. Laying these out with some Dollar Tree leaves were the perfect project for Alyzza.

This simple bulletin board was easy to pull together. I stapled cardstock up there and had a couple of pens nearby for church friends to write the Sander's a note.

The pens were placed in a paper pocket that I stapled to the board.

This beautiful cake was made by Janis, another church member who we adore (she loves doing special things for our girls, too, and we appreciate that so much).

Congratulations, Dr. and Mrs. Sanders!

Quentin wanted to give them gifts during the service, and one of his ideas was to give Mrs. Sanders a bouquet of flowers. I had just stumbled across this idea for a fall bouquet, and knew this would be the perfect gift for her. She absolutely loved it. (I hope to make one of these soon for us, but it will get greater use next fall.) Quentin also gave the Sanders a large-print New Testament and had their names engraved on it.

All in all, it was a great celebration. To God be the glory for a tremendous example of love and ministry. Thank you, Dr. and Mrs. Sanders; we appreciate you.

Sunday, October 21, 2012

Easy fall decor

I'm back....and not as late as the last time. :) Life in general is just plain busy, but I'm encouraged in many ways. I mentioned a couple of months back that I've been organizing things around the house. Even though I am not done, I'm feeling a huge sense of accomplishment lately. I can actually find things and can work quicker and easier with projects. We are seeing the Lord work mightily in our family. Alyzza is doing well post-adoption and we're seeing praises in regards to Little S' situation. Thanks so much for your prayers. We will continue to keep you updated in the best way possible.

One of the things I have been enjoying this fall is starting back up at M.O.P.S. again. Little S is in a new class and since she's older, she always looks forward to going with me. In fact, when we're out and about doing other things she'll ask if we're going to M.O.P.S. She loves it that much! This year, I joined the steering committee as the crafts coordinator. This past summer, I worked at gathering ideas from my stash of books and magazines as well as off of the internet. I came up six crafts that I'll be sharing with you after we do them. We did the first craft recently, and that is shown in the second photo. I'll explain more on that below. But, this first picture shows something I did with Little S last month. I call it "Fall in a Jar."

We went for a walk and I encouraged her to find things that she'd like to put in a jar. She found leaves, twigs, rocks and crab apples. She talked about what she found with Dad. It's great to incorporate God's creation in the conversation as well. This jar made a great centerpiece until she accidentally dropped it on the floor and the jar broke into many pieces! (Yikes!)

Here's our beautiful fall wreath we made at M.O.P.S. It was a hit with everyone! It was probably the most time-consuming prep work I've done for any craft (for 60-70 ladies), but it was well worth it. Alyzza helped me with counting strips of fabric, but the cutting had to be done by me. Thankfully, the rotary cutter came in handy. The other ones should be easier to pull together and I've had offers from some of the ladies to ask them for help if I need it. Here is the link for this wreath, which really can be used for any season using the right colors. From the instructions it does not say how many strips you need, but someone asked about that in the comments section. You need roughly 100 strips or so to make a full wreath. Use a variety of prints and solids to make it look the best. I used denim and corduroy to add some texture to it as well.

How's your fall season going so far? Have fun adding these ideas to your fall decor this year. 

Sunday, February 12, 2012

Awesome possum!

Here's a fun project that I did at my M.O.P.S. group right before Christmas. We were given a clear plate to decorate with paint markers. The goal of this was to design a plate that can be used for a celebration--a birthday, holiday, or a big accomplishment.

One of my favorite things to say to a child when they do something great is "Awesome possum!" I used it all the time when I taught, and now I say it to our girls. I knew that's what I wanted to do on my plate, so I first drew a little girl and wrote the saying on the plate. Others did their own drawings like I did while others used a print-out of a favorite cartoon character to embellish theirs.

We traced our design using a black dry erase marker. Then, we were able to trace the lines on the underside of the plate using paint markers. We used a clear sealant so that the paint doesn't wash off. They are still delicate and can only be hand-washed, so be careful if you do this.

Here's what my plate looks like:

It was such a fun and relaxing way to get creative with the ladies in my group. It will be awesome to use this when the girls accomplish something great. From having a great day at school to doing a job without being told (and perhaps in the midst of potty training this summer with Little S!), this plate can be a huge way to encourage the recipient. They can use it for a meal, a dessert, or even all day--yipee! I can't wait!:)

Saturday, January 14, 2012

A scarf for Miss C

When A and I were planning on what to make for Christmas gifts, we stumbled upon a cute scarf in the November 2011 issue of Family Fun Magazine. There was a neat section on things kids could make for their favorite people. Miss C is A's kindergarten teacher and she is awesome; she is exactly what A has needed this year. She is loving, fun and consistent. We adore her!

A helped me choose the colors of fleece--red and purple. Because she was coming down with sickness, she just didn't feel well enough to help me put this together. So, I taught her as I wove the fabric strips in and out of the scarf. Then, I added a fringe at the ends. Hopefully if we make this again for someone else, A will be able to do this project with very little help. We all thought it came out pretty cute!:)

What gifts did your children give to their teachers this year?

Thursday, January 12, 2012

Glitter snowflake

During A's Christmas break, we put this incredible snowflake together:

It's the cutest decoration for the winter season. Do you know what it's made out of? Look closely--

If you guessed Q-tips, you're right! This project was found in Family Fun Magazine's December 2011 issue. After you wrap a large piece of cardboard with plastic wrap, you arrange 18 cotton swabs as shown in the picture above. We used glitter glue at each point, but they recommended using tacky glue then sprinkling glitter onto the glue (I guess it depends on how messy you want to get, right?). You let your snowflake(s) dry overnight then find a place to hang it with monofilament line. Pretty neat, huh? :)